Report History is where a user can view reports that have been run, email a report, rerun reports, and more.
A user will always be forwarded automatically to the Report History page upon running a report from My Reports, or manually running a batch from Report Schedules. Click Here to access a short step-by-step video about this subject.
To get to the Report History page without running a report, go to Menu > Reports > History.

On the Report History page, you can use the Quick Search field to search for a report #, report name, batch name or corporation name. You can use the column filters to search for any item(s) within that column.

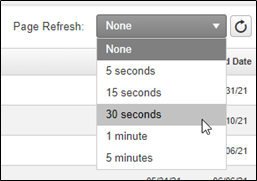
To the right of the Quick Search field, is the Page Refresh drop down. The default for Page Refresh is 30 seconds, but you can click on the circle arrow to the right of the drop down to manually refresh the page. You can also change the auto refresh time using the drop down, however, if you change it to 5 or 15 seconds, it may refresh while you are filtering to find a report or doing another function on the page. If you select ‘None’, you will need to click on the circle arrow to manually refresh the page when needed.
The columns on Report History are as follows and will show what was selected when running your report.
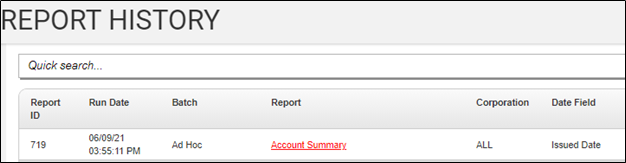

- Report ID - Shows report #, can use column filters to search for a single report or multiple report ID’s.
- Run Date - Shows run date and time (time is Eastern Time).
- Batch - Shows if report was run from the My Reports page (Ad Hoc) or will show Batch name if report(s) run from a Scheduled Batch.
- Report - Shows Runtime Report Name.
- Corporation – Shows Corporation selected when run or ALL. Can use column filter to search for reports run for a specific corporation.
- Date Field – Shows Date Field selected when report runs.
- Start Date – Shows Start Date selected when report runs.
- End Date – Shows End Date selected when report runs.
- Status – Show if the report is Processing, Queued, Failed or Processed. Can click on the Page Refresh button to refresh the page manually if desired.
- View – Shows the report export type and is where to open the report. *There is more information on this below.
- Options – Rerun, Report Information, Delete Report. **There is more information on this below.
- More Options Menu (3 bars icon) - Options for Stitch, Delete, Email reports from this menu. ***There is more information on this below.
*View: This is where you will open the report to view. Click on the View icon as shown highlighted in image below.
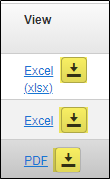
- If the report is run as a PDF, when you click on the view icon, it will open in a new tab. If run as an Excel or Excel Data Only, it will open as an Excel file.
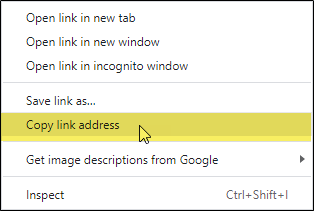
- If you would like to email your report as a web link instead of an attachment, you can easily do that from this column. Right-click on the hyperlinked verbiage (PDF, Excel), which will open a window as shown in image below. Click ‘Copy Link Address’ to copy the report weblink. You can then paste into an email to send. Please note, the weblink will be valid as long as the report is in Report History. Reports stay in Report History for 6 months and will auto delete at that time.
**Options: This column contains the Rerun, Report Information, and Delete Report icons.
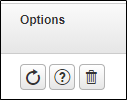
- Rerun Report (circle arrow icon) – Click on Rerun to bring up the Run Report window. The selections and filters chosen when the report was originally run will show. You can rerun the report as is, or make any wanted changes such as dates, corporation, export type, filters, etc. Please Note: If you emailed the original report from the Run Report window, the email addresses selected are contained here as well. When you click on Run Now, you will see a pop-up window advising that there are emails selected in the report before it runs. This gives you an opportunity to remove or change the emails if needed. Click Here to access a short step-by-step video about this subject.
- Report Information (? icon) – Click this icon to display the Report Information window and see the filter details selected when the report was run.
- Delete Report (trash can icon) – Click this icon to delete a report from Report History. You will see a pop-up window asking you to confirm you wish to delete the report. Reports will auto delete at 6 months.
***More Options Menu: This icon (3 bars) opens a window to reveal the options to Stitch Selected Reports, Delete Checked Reports, Email Checked Reports, Delete ALL Reports, Clear All Checkboxes, Font Size and Reset Grid.
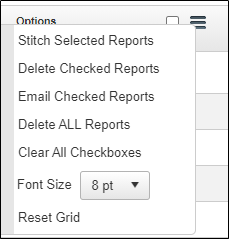
- Stitch Selected Reports – Stitching reports is a way to combine like export types into a single attachment. Please click here to be taken to the page on Stitching Reports.
- Delete Checked Reports – Allows use of checkboxes to delete multiple reports at once.
- Email Checked Reports – You can email a single report or multiple reports from Report History. Please click here to be taken to the page on Emailing Reports.
- Delete ALL Reports – This gives the user an option to delete ALL reports in Report History. There is a pop-up window that asks if the user is sure they want to delete ALL report history records as once deleted they cannot be recovered.
- Clear All Checkboxes – Allows users to uncheck all checkboxes.
- Font Size – allows users to change the Font Size on this page. This option is available on most pages in GraspDATA.
- Reset Grid – Removes any filtering and resets Report History page to default.