Contains information and steps to create or edit a batch in Report Schedules.
Users can set up a batch of reports to run automatically on a particular day and time. Batches are also useful if a user has reports they run that contain multiple filters and the user wants to make it faster to run those reports.
All user types, both Agency and Company have access to the Reports Schedules tab within GraspDATA.
Create a Batch
Click Here to access a short step-by-step video about this topic.
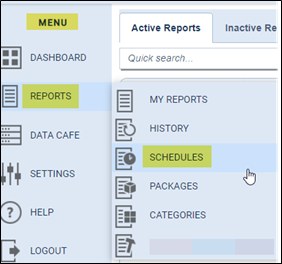
Under the left Menu go to Reports > Schedules.

This will open the Report Schedules page. Click on [+Add Batch] in the upper right corner.

This will open the Edit Batch window to create a batch. First add a name for the batch in the Batch Name field box in the upper left corner.
Tip: If you are setting up a batch for a corporation, you may want to put the corporation name first as the batches are sorted in alphabetical order, and this will keep all batches for that corporation together.

Add Reports to the Batch
Use either the Quick Search or the column filters, such as Report ID, Report Name, Category, or Sub Category, to find the first report you want to include in the batch. If you have reports marked as ‘Favorite Reports’, there is a ‘Favorites’ filter on the template as well.

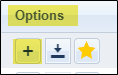
Once you find the report you wish to include, click on the plus sign (+) under the Options column on the right side. (In the below example, the star is colorized because the report is marked as a ‘Favorite’).
This will open the Report Filters window, where you will set up criteria for how the report will run.
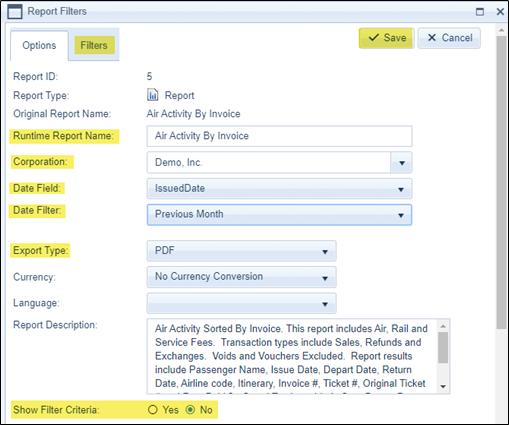
On the Options tab you can/will update the following fields:
- Runtime Report Name (can update if desired).
- Corporation (if there is a Corporation profile set up in GraspDATA and the report is for that Corporation, select it here, or select ALL).
- Date Field – Issued Date is default, can select another option.
- Date Filter – you will choose the recurring date filter, such as Current YTD, Next Quarter, Previous Month, etc. There are over a hundred options to allow you to have your report(s) run with the needed dates. (If you cannot find the Date Filter you need, please reach out to support@grasptech.com).
- Export Type – select PDF, Excel, Excel Data Only or others.
- Show Filter Criteria – Selecting ‘Yes’ will give your report a cover page, as page 1, showing the filter criteria. Selecting ‘No’ will start your report on the first page.
On the Filters tab, you have the same 5 Data Filters you have when running reports. Set up any filters you wish to apply on the report when run from the batch.
Click ‘Save’ in the upper right corner of the Report Filters window once all selections are made on the Options tab, and any desired filters are set up on the Filters tab. This will close the window and take you back to the Edit Batch window.
Your report will then show in the upper section of the window, under ‘Reports in Batch’. You can see the Runtime and Original Report Name and the Export Type (PDF, Excel) selected for the report.

If you want additional reports in your batch, search for the report and click the plus sign to add the report to the batch. Follow the steps above for Options and Filters for the report. When you add additional reports, the Corporation and Date Fields will auto fill, based on the way the previous report was set up.
If you need to edit a report, click on the Edit (pencil) icon under the Options column. Make sure to click on Save in the report window to save changes.
Once you have added all the reports you want in your batch you MUST click on the ‘Save’ button in the upper right corner of the Edit Batch window to save the batch. Clicking [Close] will close the window and NOT save. Clicking Save or Close will take you back to the Report Schedules page.

Schedule and Distribution
Please use the following links to access the steps to schedule and set up distribution of a batch.
Scheduling and Distribution of Scheduled Batches
Scheduling and Distribution of a Scheduled Batch Video
Edit a Batch
Click Here to access a short step-by-step video about this topic.
Under the left Menu go to Reports > Schedules.
Find the batch you want to edit by using the Quick Search field, the Batch ID filter, or the Name column filter.

To the right of the batch, under the Options column, click on the Edit icon (pencil) to open and edit the batch.
Once you have opened your batch, you can add reports by following the Add Reports to the Batch steps above. You can also delete, or update reports that are in the batch, by clicking the edit icon (pencil) or delete icon (trash can) for the specific report in the batch. When editing a report, you will need to click on ‘Save’ to save your changes to the report options or filters.
Once the reports are added, edited, or deleted in your batch, you MUST also click on ‘Save’ in the upper right corner of the Edit Batch window to save the batch changes.

Schedule and Distribution Changes
If changes are needed to the scheduling or distribution of a batch, please use the following links to access those steps.
Scheduling and Distribution of Scheduled Batches
Scheduling and Distribution of a Scheduled Batch Video